WHO WE ARE
Learn what drives our vision and values every day.

Our expert aged care team ensure aged care facilities run smoothly with short-to-long term skill options.
.png?width=1024&name=image%20(18).png)
Looking for a new career challenge, exciting opportunities, and some fun adventures? We can make it all happen.
.png?width=1024&name=image%20(19).png)
Discover your next Allied Health opportunity with our guidance, tailored to your skills and ambitions.
Submit your CV with a few details of what you’re after, and one of our specialist consultants will get in touch.


We connect job seekers with roles that match their skills, values, and career goals. Start your journey today.


Discover the key reasons and benefits of partnering with E4 People for reliable, high-quality staffing solutions.

Discover how E4 People creates exceptional client partnerships tailored to their unique staffing and skill needs.

Explore E4 People’s tailored staffing solutions designed to meet your workforce demands.

Quickly request qualified healthcare staff through E4 People’s simple, streamlined booking service.

Practical guidance and expert insights to support healthcare staffing success.

Supportive information to help individuals navigate aged care confidently.

Culturally respectful guidance for delivering First Nations care.

Real-life inspiration from aged care professionals who've advanced careers.

-1-1.png?width=450&name=image%20(2)-1-1.png)

Connect with us to ask questions, request support, or learn more about our services.

Book a consultation to discuss your needs and explore how we can help.

Take the next step toward your ideal healthcare role with E4 People.

Share your feedback to help improve E4 People’s services and support.
The Entire OnHire Guide is your go-to resource for understanding how to use the E4 shift-booking app with confidence. From setting up your profile to managing shifts, notifications, and availability, this guide walks you through everything you need to know to get the most out of your OnHire experience.
A link will be sent through once your Consultant has completed your interview and is happy to proceed with your onboarding
The app will appear as the top link, the icon is shown below - once it appears, select download.
Access code for Entire OnHire: E4
Once downloaded, enable notifications:
This will make sure you never miss out on news about the latest shifts that become available or any other news/communication from your agency.
Open the app on your mobile device.
Then, enter the credentials provided by the first agency to access your account.
Complete the login process and ensure you can access your profile and other agency-specific features.

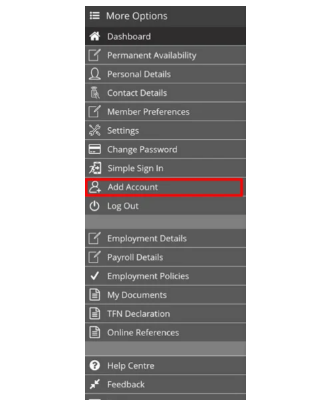
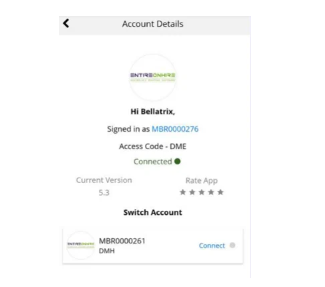
In the menu, search for the option "Add Account".
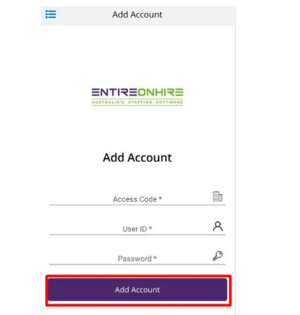
You will be prompted to enter the credentials (username and password) provided by the second agency.
Fill in the required information and select the "Add Account” button.
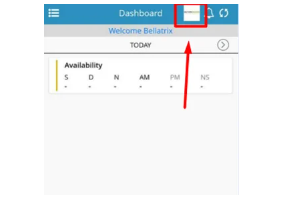
After successfully adding the second agency, you may see a selection menu to choose which agency you want to log in under.
Tap on the agency you wish to access to switch to that agency's profile and features
Now that you have successfully logged in under two agencies, you can switch between them by using the agency selection menu or any agency-specific navigation options provided in the app.
Step 1: Launch the App
Open the app on your mobile device. If you haven't logged in yet, enter your credentials to access your account

Step 2: Access Your Profile
Look for the little Hamburger Menu and click "Personal Details" or "Contact Details"

Step 3: View Your Personal Information
“Personal Details” - Once you're in the section, you'll see your existing personal details displayed. This includes your name, gender, DOB and transport details
“Contact Details” - Once you're in the section, you'll see your existing personal details displayed. This includes email, phone, emergency contact and address

After successfully adding the second agency, you may see a selection menu to choose which agency you want to log in under.
Tap on the agency you wish to access to switch to that agency's profile and features.
Now that you have successfully logged in under two agencies, you can switch between them by using the agency selection menu or any agency-specific navigation options provided in the app
Open the Workforce App on your mobile device. If you haven't already logged in, enter your credentials to access your account.

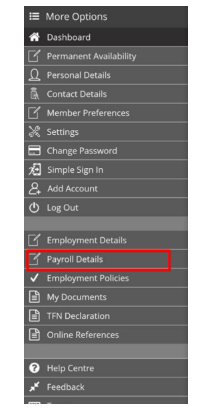
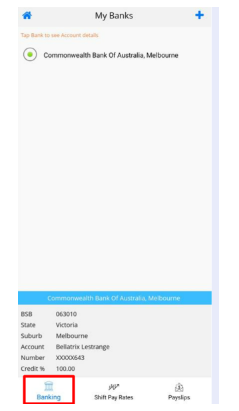
Look for the “Payroll Details” option in the app's main menu or dashboard. Tap on it to access the Finance section.
In the Finance section, you'll find the "Banking" option. Tap on it to view or update your banking information, such as your account number, bank name, and other relevant details. Ensuring accurate banking information ensures you receive timely payments
Explore the "Shift Pay Rates" section to get an overview of the general guide for minimum pay rates for different shifts. Remember that these rates are just a guide and may not represent the true worth of specific shifts. For detailed or specific pay information, consult your employer or HR department.

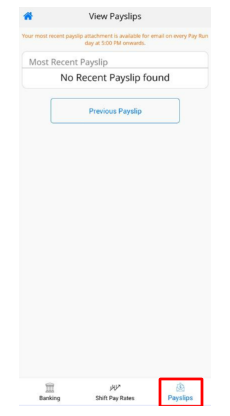
In the "Payslips" section, you can access your digital payslips for each pay period. Review and download your payslips to keep track of your earnings and deductions as well as email to yourself.
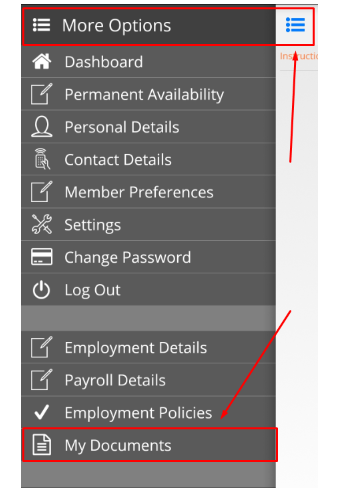
Tap the "More Options" icon located in the top left corner of the app. It's represented by three horizontal lines.
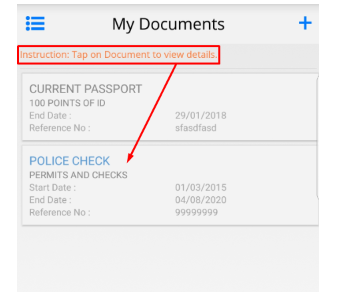
Scroll down to locate and select "My Documents" from the options available.
In the Finance section, you'll find the "Banking" option. Tap on it to view or update your banking information, such as your account number, bank name, and other relevant details. Ensuring accurate banking information ensures you receive timely payments.
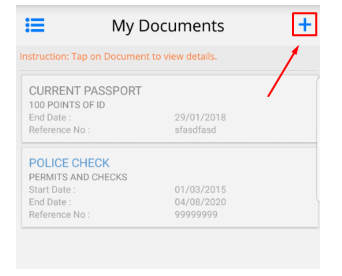
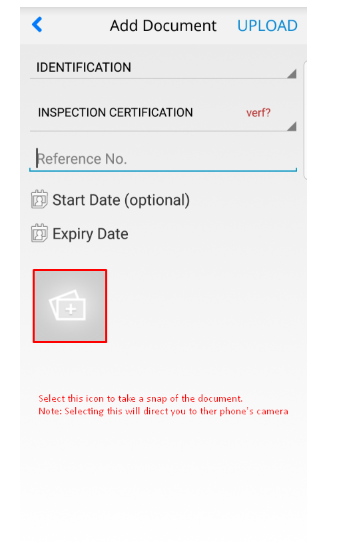
To upload or update a document, click on the "+" sign located in the top right-hand corner of the screen.
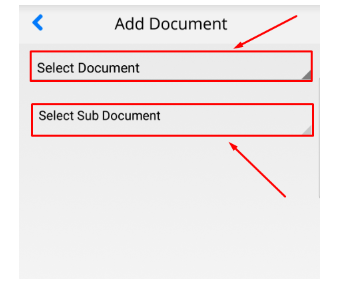
If any mandatory fields need to be filled, go ahead and enter the necessary data. If it says "(optional)," you can skip this step.
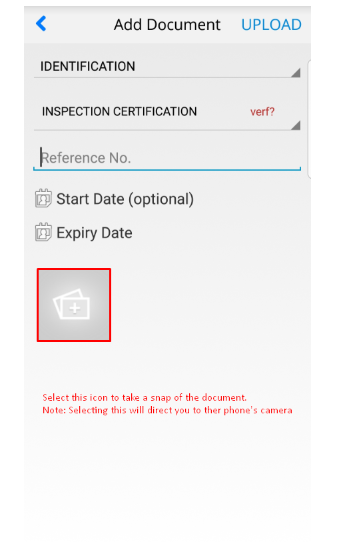
Click on the picture icon to capture an image of the document using your device's camera. This will attach the image to your document.
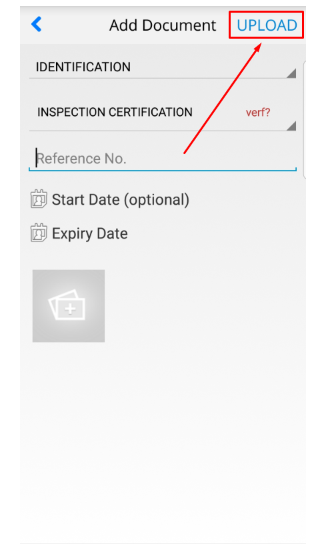
Once you've taken a snap of the document, click on "Upload" in the top right-hand corner to complete the process.
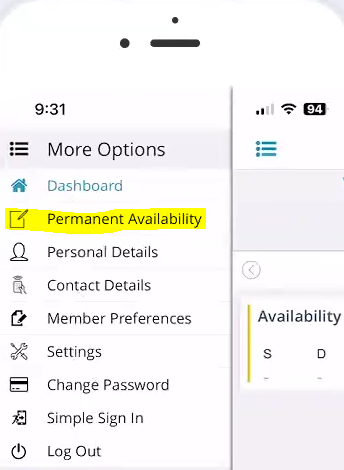
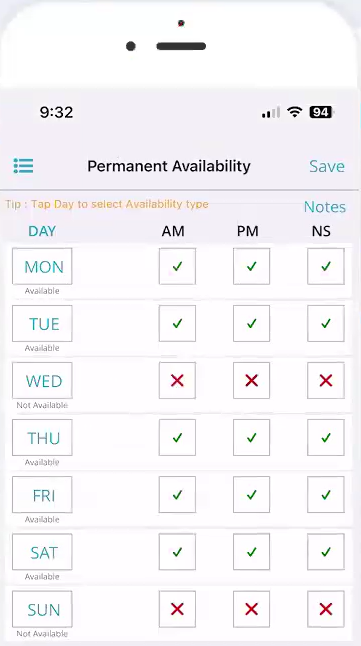
You will now be able to set permanent and temporary availability. Permanent availability will be your standard ongoing availability which will your ongoing availability. You can put notes in your availability for any specific requests. Temporary availability will notify us of temporary amendments to your permanent availability. You can update your temporary availability up to 30 days in advance.
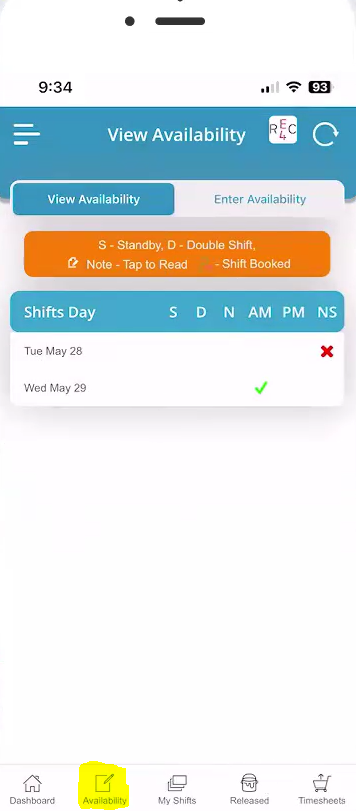

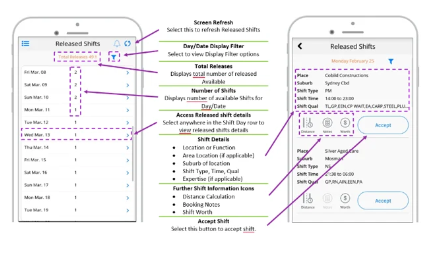
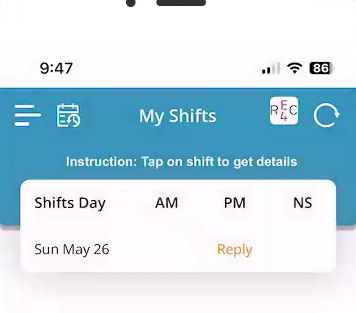
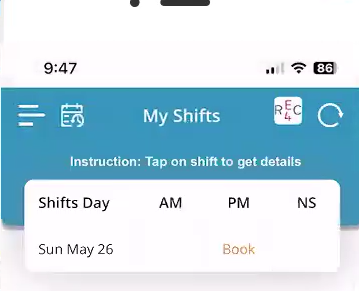
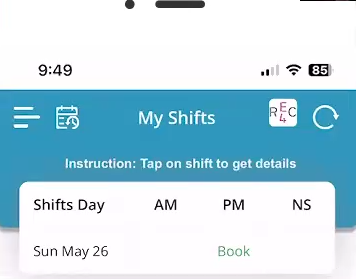
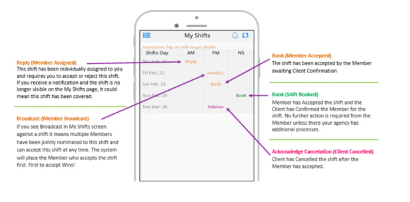
Any shifts that appear in the My Shift Screen have been allocated to you or Multiple Members depending on the status. For further information on what each status represents please view below.
Any shifts that appear in the My Shift Screen have been allocated to you or Multiple Members depending on the status. For further information on what each status represents please view below.
As a member to receive your pay, you need to be submitting your timesheet at the end of every shift. By Submitting your timesheet via the app you are able to
To learn how to submit a digital timesheet please follow the steps outlined in this guide. If you need assistance with submitting a timesheet, please contact the Help Centre details found in the top left Menu of your Mobile App.
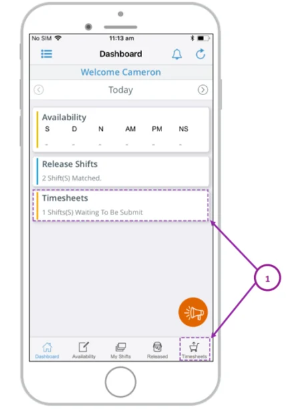
Select the Timesheets icon on the dashboard or via the Main Access Menu.
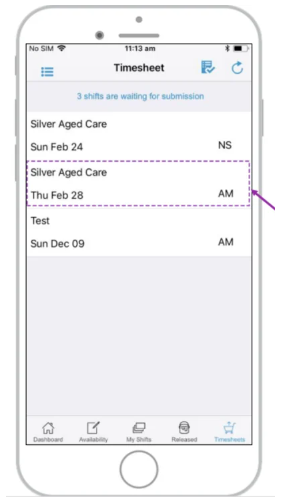
Select the relevant shift you wish to submit a Timesheet for within the Timesheet Submission screen.
Please note shifts will only be displayed on the submission screen once the current time is greater than the booked shift finish time. Meaning you cannot submit a Timesheet prior to the original shift's finish time.
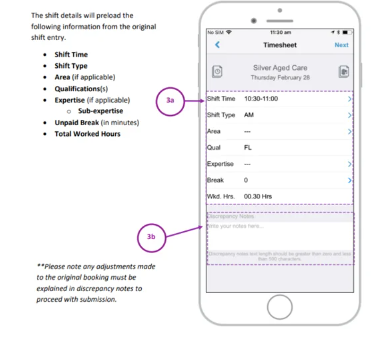
Review the shift details and select any fields that need to be adjusted from the original booking.
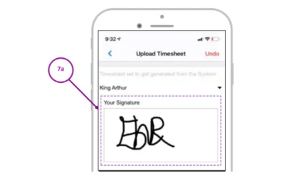
To edit any of the fields (3a) select the applicable field.
Certain locations and shifts have documents applied that may include instructions for timesheet submissions/protocols.
If required, please view or upload documents by selecting the relevant icons outlined below.
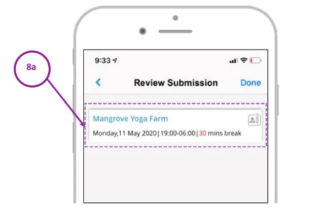
It is a mandatory requirement for timesheets to be authorised. On the selection of review-approved details, the below screen will load. The details of the member's timesheet submission will appear. Any details in red highlight a change from the original booking.
Supervisors will be able to review a detailed description of the submission, they can select the icon highlighted below.
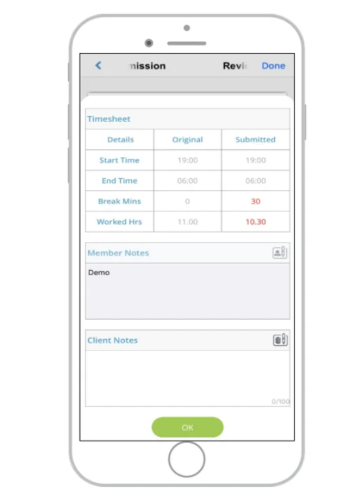
Below is an expanded view of the shift details for supervisors to review. If any of the details are not correct the member is required to return to their
Supervisors can add notes that will be highlighted to the finance team to review during their validation of shifts for payroll and invoicing.
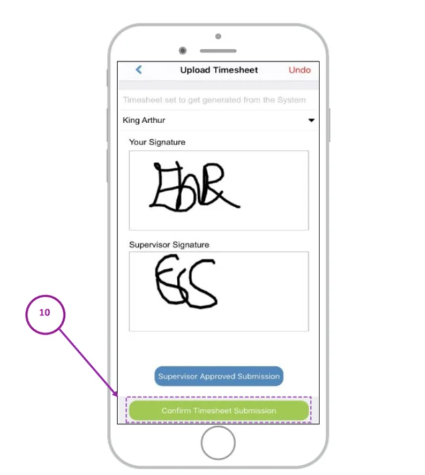
Once all required signatures are entered select the Confirm Timesheet Submission button located at the bottom of the screen.
An Automatic Timesheet Number will be created once the timesheet has been successfully submitted. Press OK to continue using the Members App
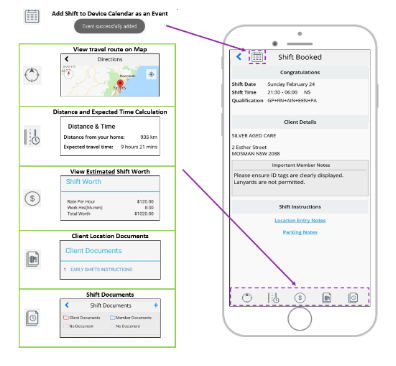
For the Shift Timesheet, the Review Submission screen now shows the Travel Claims and Shifts Documents details to the Client/ Supervisor when the flag is set as ON respectively.
When the Travel Claim flag is set as ON for the member – The Travel Claim is visible on the Review Submission screen for the Client/ Supervisor, whenever the member adds travel claim details as shown in the figure below.
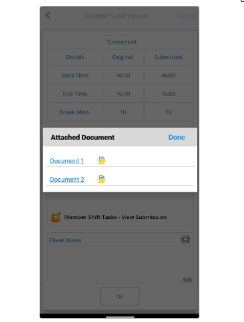
When the Shift Document flag is set as ON for the member – The Shift Document attached by the member is visible on the Review Submission screen for the Client/ Supervisor, whenever the member adds documents.
Click Shift Document to view the Attached Document as shown in the figure below.
When the client reviews the Job Timesheet, the Review Submission screen shows the Travel and Notes details to the Client / Supervisor when the flag is set as ON respectively.
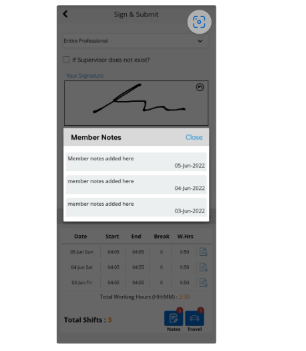
In the Review Submission screen, the timesheet details show the Date, Start time, End time, Break mins., and Total Working Hours. The Travel and Notes icons show the number of Travel Claims and Notes added.
For the Job Timesheet, when the Travel Claim flag is set to ON for the member – The Travel icon is visible on the Review Submission screen for the Client/ Supervisor, whenever the member adds travel claim details.
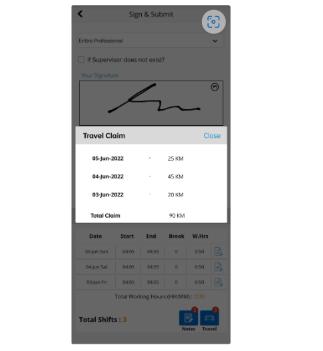
Click the Travel icon, to view the Travel Claim details.
For the Job Timesheet, when the Notes flag is set to ON for the member – The Notes attached by the member are visible on the Review Submission screen for the Client/ Supervisor, whenever the member adds Notes.
Click the Notes icon, to view the provided Notes.